Clipping Dog Nails Black: How to Cut Safely with Expert Tips for Stress-Free Trimming
Cutting a dog’s nails can be a daunting task for many pet owners, particularly when the nails are black. The challenge lies in identifying the quick, which is harder to see in black nails compared to lighter-colored nails. However, with the right tools and techniques, this seemingly intimidating process can be done safely and effectively. There's no need to worry - this article will provide practical tips to make trimming black dog nails easier and less stressful for both you and your pet.
One of the keys to successfully trimming black dog nails is understanding the anatomy of the nail itself. Knowing where the quick is located and what to look for while cutting will help pet owners avoid causing discomfort to their dogs. Moreover, using dog-safe clippers or a grinder and following a careful approach can make the process more manageable and stress-free for both the owner and the pet. Following these guidelines will help ensure that the experience is a positive one and that the dog’s nails are correctly maintained.
Understanding Black Nails on Dogs
Why Some Dogs Have Black Nails
Some dogs have black nails due to their breed, genetics, or pigmentation. Dog nails can have different colors, such as white, clear, or black. The pigmentation responsible for the color is called melanin, which is the same pigment that determines a dog’s skin and fur color. Dog breeds with dark fur or skin may have black-pigmented nails. In clear or white nails, the quick appears as a pink area, making it easier to identify and avoid when trimming, unlike in black nails where the quick is harder to see. Other dogs have a mix of black and clear nails, depending on their genetic makeup.
Anatomy of a Dog's Nail
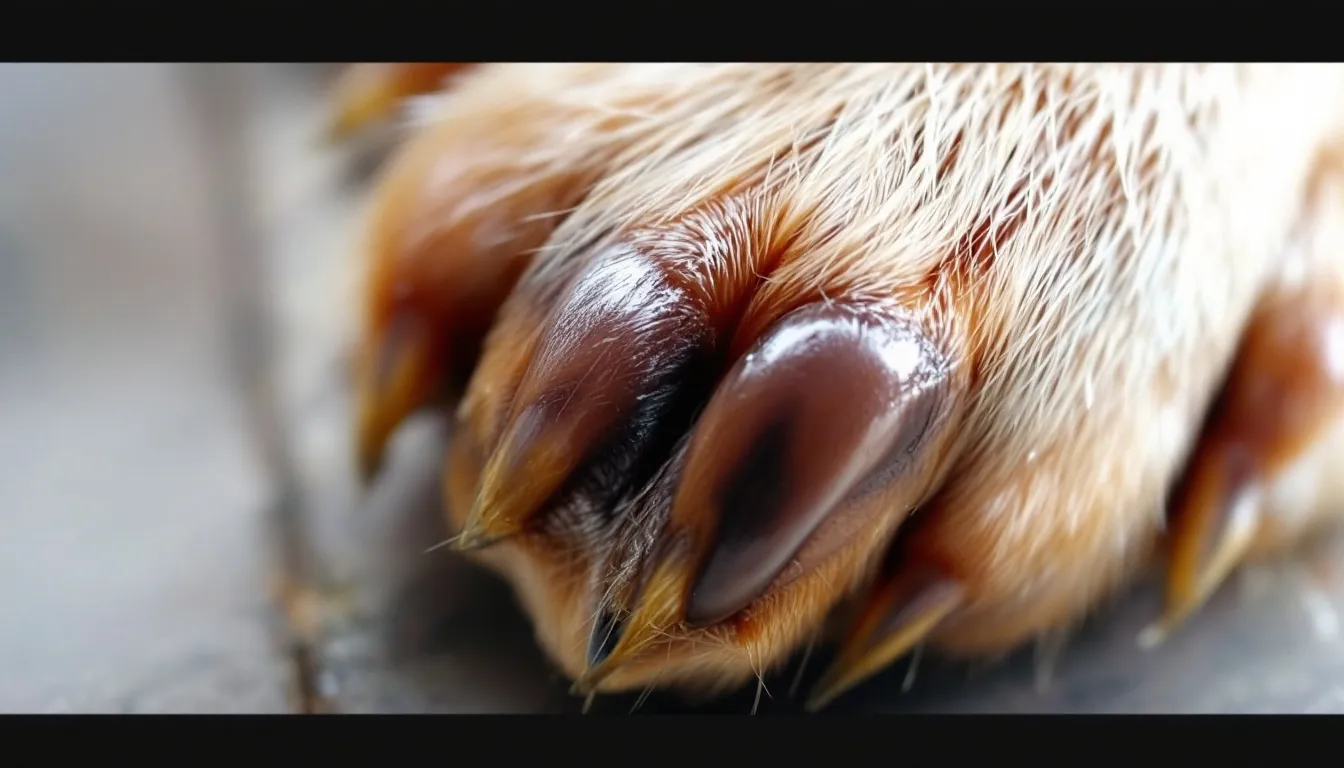
A dog’s nail has two main components: the nail and the quick. Each dog's toenail is attached to the toe and consists of an outer nail and an inner part called the quick. The nail is the outer, hard covering made of keratin, similar to human nails. The outer nail protects the sensitive inner part, which contains nerves and blood vessels. The quick is the central, sensitive area of the nail, containing blood vessels and nerve endings. When trimming a dog’s nails, it is crucial to avoid cutting the quick as it can cause pain and bleeding.
For dogs with clear nails, locating the quick is relatively easy as it appears pinkish within the nail. However, for dogs with black nails, it is much more challenging since the quick is obscured by the dark pigmentation. When cutting black nails, it’s essential to go slowly, take tiny trims, and pay attention to any signs that you are nearing the quick. If you notice a whitish or grayish area after looking at the trimmed nail head-on, you are still in the “dead area” and can proceed with caution (source).
Using proper tools, such as clippers designed for dogs’ nails, and correct positioning for cutting the nail from top to bottom (not side to side) can help ensure a safe and pain-free nail trimming experience for your dog.
Tools and Preparation
Before you begin trimming your dog’s black nails, it’s essential to have the right tools and be adequately prepared. Choosing the right clipper is essential for safe and effective nail trims. This section will provide a guide on selecting the right nail clippers—there are different types of nail trimmers available for dogs—and gathering additional supplies needed for the task.
When selecting a tool, remember that there are two styles of nail trimmers: guillotine and scissor types. Using the right tool will help you safely clip your dog's black nails.
Selecting the Right Nail Clippers
When choosing nail clippers for your dog, consider the size of your dog and the type of clippers that will work best for them. There are two common types of clippers available:
-
Guillotine Clippers: These clippers have a small hole through which you thread the dog's nail, then squeeze the handles to lower a blade and slice off the end of the nail. They work best for small to medium-sized dogs with black nails but can be more challenging for larger dogs with thicker nails.
-
Scissor Clippers (also called Millers Forge Clippers): These clippers look like scissors and have sharp, curved blades designed to cut through the nail cleanly. They are suitable for dogs of all sizes and work particularly well for larger breeds with thicker nails.
Choose a durable, high-quality pair of clippers with sharp blades to ensure a clean cut without causing discomfort or injury to your dog.
Gathering Additional Supplies
In addition to the nail clippers, here are some helpful supplies to have on hand:
-
Styptic Powder or Cornstarch or Corn Starch: In case you accidentally cut the quick (the blood vessel in the nail), styptic powder or corn starch can help easily stop any bleeding.
-
A Flashlight or Penlight: A light source can help you see the inside of the nail more clearly and avoid cutting the quick, especially when dealing with black nails.
-
Dog Treats: Reward your dog before and during the nail trimming process to create a positive experience and ensure their cooperation.
-
A File or Nail Grinder: Using a file or nail grinder after cutting can help smooth rough edges and prevent injury from sharp nails.
When trimming, it's best to cut only a small bit of the nail at a time. This helps you avoid hitting the quick and keeps the process safe and comfortable for your dog.
Having the right tools and supplies at hand will make the process of trimming your dog’s black nails safer and more efficient.
Cutting Black Dog Nails Step by Step
Finding the Quick
When cutting a dog’s black nails, identifying the quick is crucial to avoid accidentally causing pain or injury. A simple method for locating the quick is by shining a flashlight beneath the dog’s nail. This will reveal a dark mass inside the nail, which is the quick to avoid. You should stop trimming at the point where you notice a change in color or texture, as this indicates you are approaching the quick. For best results and safety, focus on trimming one nail at a time to ensure accuracy and prevent cutting into the quick.
Proper Nail Cutting Technique
Follow these steps to ensure a safe and effective nail-cutting experience for your dog, especially when trimming black nails, which require extra care to safely trim and avoid injury:
-
Hold the dog’s paw firmly but gently: Provide support to prevent accidental movement during the process.
-
Position the clippers: Cut the nail from top to bottom rather than side to side, as suggested by Rover.com. Before you begin, gently tap the clippers against your dog's nail to help them get used to the sound.
-
Trim a small length: Only clip a small amount at a time—remove about 1/16th of an inch from the nail tip. This is especially important when trimming black nails, as the quick is harder to see. Look at the dog’s nail head-on after the first cut to ensure you’re not too close to the quick.
-
Repeat for all nails: Using the same method, trim all other nails on each paw. After finishing, check that all nails are trimmed to the appropriate length and that your dog’s nails are safely trimmed.
Dealing with Minor Bleeding
Sometimes, accidents happen, and minor bleeding can occur if you nick or catch the quick while trimming. If it does, stay calm and apply the following steps:
-
Apply styptic powder or cornstarch: If the quick is caught and starts to bleed, apply styptic powder or cornstarch to help stop the bleeding and provide a mild antibacterial effect.
-
Apply pressure to the bleeding area: Use a clean cloth or paper towel to gently apply pressure to the bleeding nail.
-
Reassure the dog: Keep the dog calm and comfortable during this process. Offer a treat or praise once the bleeding has stopped.
The most important thing is to proceed with care and patience, ensuring that both you and the dog are at ease during the nail-cutting process.
Maintaining Your Dog's Nails
Establishing a Routine
Establishing a routine is crucial for maintaining your dog’s black nails. Trim your dog’s nails regularly, about every 3-4 weeks, to prevent overgrowth and promote healthy paws. Start by introducing your dog to the nail clippers or grinder slowly, allowing them to sniff and get comfortable with the tool. Gradually get your dog used to having their paws touched and paws handled by gently touching and holding their paws, then using the clippers or grinder, and reward your dog with treats and praise for staying calm and cooperative.
To simplify trimming, choose when your dog is calm and relaxed, such as after a long walk or play session. Consistently trimming your dog’s nails at the same time, such as once a month, will help your dog become more familiar with the process and make it less stressful for both of you.
Dogs are creatures of habit and respond well to positive reinforcement alongside experiences outside their comfort zone. You can combine an experience that’s otherwise uncomfortable with a positive one by distracting your dog with a Devil Dog Ultra-Thick Bully Stick or rewarding them with one afterward.
Preventing Overgrowth
Preventing overgrowth of your dog’s black nails is essential for their overall health and comfort. Untrimmed nails can cause pain, infections, and even difficulty walking. Overgrown nails can negatively impact your dog's foot and leg health, potentially leading to foot malformations or gait issues. To trim your dog’s nails safely, follow these steps:
-
Hold your dog’s paw firmly but gently: This will help stabilize the nail and reduce the risk of cutting too deep or trimming at the wrong angle. Make sure your dog is comfortable with having their feet handled.
-
Position the clippers: When using clippers, make sure to cut the nail from top to bottom, not side to side. This will help prevent accidental cuts or damage to the nail bed.
-
Trim a small length of the nail: To avoid cutting the quick (the sensitive blood vessel inside the nail), trim only about 1/16th of an inch at a time. This is especially important for black nails since it is difficult to see the quick.
-
Check the nail head-on after each trim: This will help gauge if further trimming is needed or if you are close to the quick. Remember to stop trimming when you see a small dark dot in the center of the cut nail – this is the start of the quick.
-
Inspect all feet and legs: Check each foot and leg for signs of nail overgrowth or discomfort to ensure your dog’s overall paw and leg health.
By establishing a routine and trimming your dog’s black nails carefully, you can ensure their paws remain in excellent condition and prevent overgrowth-related issues.
Frequently Asked Questions
How to find the quick?
With white dog nails, the quick is relatively easy to see, as it’s the pinkish area in the center of the nail. The dog's quick is the sensitive part of the nail that contains nerves and blood vessels, and it should be avoided during trimming to prevent pain and bleeding. For black nails, it’s more difficult to spot. Carefully examine the nail, looking for a dark circle or oval shape. As you trim the nail, pay attention to the cross-section; if it appears whitish and chalky, you are still in the dead area. If you see a dark dot in the center, stop cutting, as you’ve reached the quick. You can also try shining a light behind the nail to help locate the quick.
Best clippers for black nails?
It is essential to use the right tool when cutting your dog’s black nails. Using guillotine-style clippers or scissor-type clippers designed explicitly for pet nails is recommended. Some clippers are better suited for thick claws, especially on larger breeds, providing more control and safety during trimming. For extra precision, many pet owners prefer using a nail grinder, which allows you to shave off small amounts of the nail without cutting too deep.
How often to trim?
Trimming frequency depends on your dog's activity level, the surfaces they walk on, and how fast their nails grow. Typically, dogs' nails should be trimmed every 3-4 weeks. It's essential to monitor your dog's nails regularly and adjust the trimming frequency as needed.
Trimming overgrown black nails?
If your dog’s black nails have become overgrown, be patient and trim them gradually. Watch for signs that your dog is stressed, such as panting or pulling away, and take breaks if needed to help them feel more comfortable. Cut small amounts at a time, checking for the quick after each cut to avoid injury. Cutting overgrown nails may require several sessions over a few weeks, allowing the quick to recede before cutting more.
When to stop cutting?
Stop cutting when you see a dark dot in the center of the nail cross-section, indicating you’ve reached the quick. Once the nails are properly clipped, you should stop to avoid injury. Cutting further risks injury and pain for your dog. If you accidentally cut the quick, use styptic powder or cornstarch to help stop the bleeding.
Handling black dog nails?
Hold your dog’s paw firmly but gently while trimming its black nails. Position the clippers to cut the nail from top to bottom, not side to side. Encourage your dog throughout the process with praise and rewards for a positive grooming experience—making it enjoyable for your pooch and doggy. Always be cautious to avoid a bite, especially with nervous or reactive dogs; patience and desensitization can help. If you have kids, supervise them closely and teach them safe handling during nail trims. When trimming tail nails, proceed gradually and carefully to avoid injury. For anxious dogs, try handling their paws for short periods, even when you’re not cutting their nails, to help them become more comfortable with the process. Keeping your dog's nails trimmed can also help protect your house from scratches on floors and furniture.
Need something to keep your dogs occupied and focused on something exciting?
Consider one of our long-lasting, enticing treats like a Himalayan Yak Chew, Bully Stick or Elk Antler.
